JV 36 daughter board V2

Project Description
Main Project Image
The project owner hasn't added main project image yet.
Project description
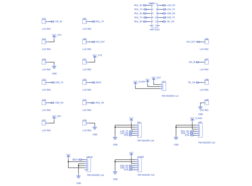
When referring to pads and components the side with the Logger is referred to as top, the OSD as bottom. The flash switch is always on the right, the dipswitches on the left. The side with the RX is referred to as the downside, the OSD/Logger side is the upside.
The dipswitches are ON (1) when pressed towards the middle of the board, OFF (0) when on the outside.
Pads on the right-upside, from top to bottom.
MUL RX
MUL TX
SBUS
VCC_VTX
VCC_EXT (5v)
Pads on the right-downside, from top to bottom.
OSD RX
OSD TX
VID OUT
GND
...
TEL_RX
GND
Pads on the left-upside, from top to bottom.
VCC VTX
GND
VID IN (long pad)
VID OUT
DIP/flash switch settings (from top to bottom):
During normal operation you can use either the openlogger or telemetry.
logger DIP:10 00 00, flash set to top
telemetry DIP: 00 00 10, flash set to top
You can flash the logger and OSD using the FTDI port at the top.
flash logger DIP:11 00 00, flash set to bottom
flash OSD DIP:00 11 00, flash set to bottom
FTDI to FC DIP (for flashing ESCs on F3 targets) DIP: 00 11 00, flash set to top, FTDI 5v disconnected
Gallery
The project owner hasn't added any images yet.
Design Files